是时候学习systemverilog和synopsys软件的使用了。
这里也是开始正式进入专业以及软件相关的学习,此处参考的内容为chipverify的相关指导书,链接在这里 。
另:sv的LSP mode下载需要输入:MasonInstall svls,这个mode支持verilog和systemverilog的语法。
quick cheet sheet 这一部分我会把sv的一些关键部分摘下来形成一个方便自己速查/长时间不用之后的快速复习。
data type systemverilog 新增加了几种数据类型,如下:
data type
description
logic
用于替代reg,可以用于组合逻辑和时序逻辑,支持四态
bit
只支持0和1
byte
8bits, signed(default)
shortint
16bits, signed(default)
int
32bits, signed(default)
longint
64bits, signed(default)
integer
32bits, signed(default), compatible with older version
time
64bits, unsigned
string
很常规的字符串
procedure block 除了增加数据类型,systemverilog还增加了很多关键词。
always_comb always_ff always_latch:用于消除verilog中综合器遇到always块时遇到的判断错误以及其他问题。
always_comb:用于描述组合逻辑,而且不必写敏感列表,会自动识别这个块内部读到的信号量。
1
2
3
4
5
6
7
8
9
10
11
12
13
14
15
16
17
18
19
20
module alu_4bit( input logic [3:0] a, input logic [3:0] b, input logic [1:0] op_code, output logic [3:0] result ); always_comb begin case(op_code) 2'b00: result = a + b; 2'b01: result = a - b; 2'b10: result = a & b; 2'b11: result = a | b; endcase end endmodule
值得注意的是,always @*只会读取直接被block使用的信号量,如果有function的话无法自动读取,必须被显示的作为输入传入或声明,每次被函数使用的信号被修改都要在使用函数前更新。但是在always_comb中,整个块都被设置为敏感的,直接使用和被函数调用的信号量都会被检测。
另外,always_comb中,左边被赋值的量无法被其他的过程块驱动,可以避免出现多个always_comb争端控制权的错误。
always_latch被专用于锁存器逻辑。他在很多方面和always_comb一样,但是他会在模拟开始时运行一次保证模拟输出的连续性。两者的区别在于,软件工具对always_latch和always_comb进行的操作是不同的,比如latch逻辑中允许在某些分支情况下不分配操作,此时综合工具会推导出锁存器保持信号值,但是comb是不允许的,任何输入情况下都必须有定义。
always_ff用于时序逻辑,需要明确写敏感列表,以此决定同步或异步。敏感列表中所有值都必须明确指明在上升沿或者下降沿使用,事件控制必须用在块开始。
string string是一个在测试中常用的数据类型,它可以这样定义:
1
2
3
4
5
6
7
8
9
10
11
module tb; string blur = "blurzzz"; initial begin $display("%s", blur); foreach (blur[i]) begin $display("%s", blur[i]); end end endmodule
关于string的其他用法都和基本的verilog/cpp差不多,这里把一些常用的string.func()写一下:
usage
comments
str.len()
获取string中的character数
str.putc(int index, byte char)
将第i个character替换
str.getc(int index)
返回指定位置的内容
str.tolower()
返回全小写
str.compare(string s)
比较两者是否相等
str.icompare(string s)
是否不等
str.substr(int i, int j)
返回一个从i到j的子串
还有一些转换函数如下:
usage
comments
str.atoi()
str->ASCII十进制整数
str.atohex()
str->十六进制
str.atooct()
str->成八进制
str.atobin()
str->成二进制
str.atoreal()
str->ASCII的十进制表示的实数
str.itoa(integer i)
把i的十进制表示存入str
str.hextoa(integer i)
把i的十六进制表示存入str
str.octtoa(integer i)
把i的八进制表示存入str
str.bintoa(integer i)
把i的二进制表示存入str
str.realtoa(real r)
把i的实数表示存入str
enum enum 用于枚举
1
2
3
4
5
6
typedef enum logic [1:0] {IDLE=2'b00, BUSY=2'b01, DONE=2'b10} state_t; state_t state; state = IDLE;
在定义时,enum如果没有定义某一项的值,他的值会是上一项取相应的增量,如果第一项没有定义值就定义为0;如果是给多个变量赋一个值,是赋值给第一个量。
1
2
3
4
enum {RED, GREEN, BLUE} // RED=0, GREEN=1, BLUE=2, int enum bit[1:0] {RED, GREEN, BLUE} // RED=2'b00, GREEN=2'b01, BLUE=2'b10
枚举还有一组用于循环的func:
usage
comments
.first()
返回第一个成员的值
.last()
返回最后一个成员的值
.next(int unsigned n = 1)
返回从当前值开始的下n个值
.prev(int unsigned n =1)
返回从当前开始的前n个值
.num()
返回给定枚举的元素个数
.name()
返回当前的字符串表示形式
枚举一般只取枚举集之内的值,显式强制转换可以分配枚举集以外的值。
arrays 所有的array都是这样定义的:
1
2
3
[data type] [identify name] [num of elements/key]
static arrays 类似cpp的静态数组,长度在编译前就已知。
1
2
3
4
5
6
7
8
9
10
11
12
13
14
15
module tb; bit [7:0] m_data; initial begin m_data = 8'hA2; for (int i=0;i<$size(m_data);i++) begin $display("m_data[%0d] = %b", i, m_data[i]); end end endmodule
静态数组可以分成两类,packed 和 unpacked.
1
2
3
bit [7:0] dd; //vector; bit [2:0][7:0] m_data; //packed; bit [15:0] m_mem [10:0]; //unpacked;
这两者的区别体现在内存布局,访问方式,接口连接等。
packed: m_data被视作是一个连续的位向量,共计3*8=24bits,连续分配。它可以作为一个24位的整体变量进行操作,赋值,连线,也可以进行切片,比如m_data[15:6]。整体上其实被当作一个长向量,只不过分成多维度方便使用。packed arrays通常被用作数据通路定义,寄存器定义,端口接口等需要精确控制位宽和保证连续性的地方。
unpacked: m_mem 被视为11个独立元素,每个元素是16bits的向量,这11个元素不会保证物理/对应连续,是相对松散的集合。unpacked arrays不能作为一个整体连接到端口 ,比如m_mem不可以直接连接到176位的端口,除非是给11个元素分别分配。主要用于定义存储单元,内存模型,查找表,行为级数组,是离散性的。
有一种输出格式是%p,原义是 pretty print,用于结构体和数组的输出。它可以自动遍历,展开,并且采取一种格式化,容易阅读的方式输出。比如:
1
2
3
4
5
6
7
8
9
10
11
12
13
14
15
typedef struct packed { bit [7:0] addr; bit [3:0] len; bit valid; } transaction_t; transaction_t req; req.addr = 8'hA5; req.len = 4'hC; req.valid = 1'b1; $display("Request: %p", req);
输出结果是:
1
2
Request: '{valid: 1, len: 'hC, addr: 'hA5}
dynamic arrays 动态数组是指编译时不知道具体长度的,需要在运行时确定并分配的。
1
2
3
4
5
6
7
8
9
10
int m_mem []; m_mem = new [5]; m_mem = '{31,67,10,4,99}; foreach (array[i]) $display("array[%0d] = %0d", i, array[i]);
需要等到使用new才能够确定其长度。
dynamic array有一些函数可以用…
usage
comments
.size()
返回array的长度
.delete()
清除array中的所有元素和分配的空间
有时我们想要在不清除原来的所有内容的情况下拓展dynamic array的长度,我们可以:
1
2
3
4
5
6
7
8
9
10
int array []; array = new [10]; array = '{???????}; array = new [array.size() + 1](array); array [array.size() - 1] = 21;
associative arrays associative array,类似于python字典,associative
1
2
3
4
5
6
7
8
int mem[string]; mem["addr1"] = 32'hA5A5; mem["addr2"] = 32'h1234; int m_data[int]; m_data [32'h123] = 333;
也有一些可用的函数:
usage
comments
arrays.num()
返回arrays中的元素数量
arrays.size()
也是返回元素数量
arrays.delete([index])
如果指定了index,就删除对应的一项
arrays.exists(input index)
检查key下是否有元素,有返回1,无0
arrays.first(ref index)
返回第一个index下的值,如果为空array就返回0
arrays.last(ref index)
返回最后一个index下的值,如果为空array返回0
arrays.next(ref index)
找到比当前key更大一个的key下的值
arrays.prev(ref index)
找到比当前key更小一个的key下的值
dynamic array of associative arrays 当然还有嵌套的用法,比如:
1
2
3
4
5
6
7
8
9
10
11
int fruits [] [string]; initial begin fruits = new [2]; fruits [0] = '{"apple":1, "grape":2}; fruits [1] = '{"melon":3, "cherry":4}; end
按照我们之前说的原则,数据类型为int, identity 是fruits,fruits可以看做是有x个元素,每个元素是从string到int的一个associative arrays.
dynamic array within each index of an associative arrays 1 2 3 4 5 6 7 8 9 typedef int int_data []; int_data fruits [string]; fruits ["apple"] = new [2]; fruits ["apple"] = '{4,5};
在这里,是一个associative arrays,以string为key,每个key对应一个动态int类型的数组。
array manipulation array有很多内置的函数。
如果想要从已有的array里面找到想要的东西,我们可以:
usage
comments
find()
返回所有满足条件的元素
find_index()
返回所有满足条件的元素的索引
find_first()
返回第一个满足条件的元素
find_first_index()
返回第一个满足条件元素的索引
find_last()
返回最后一个满足条件的元素
find_last_index()
返回最后一个满足条件的元素的索引
这些函数需要搭配with使用。 没指定的话找到的元素可以用item指代。
1 2 3 4 5 6 7 8 9 10 11 12 13 14 15 16 int array[9] = '{4,7,2,5,7,1,6,3,1}; a = array.find(x) with (x>3); $display("find(x):%p", a); // 输出结果是: // find(x) : '{4,7,5,7,6} b = array.find_first with (item < 5 & item >=3); #display("find_first: %p",b); //输出结果是: // find_first: '{4}
以下是不使用with的查找命令 :
usage
comments
min()
返回最小的元素
max()
返回最大的元素
unique()
返回只出现一次的元素
unique_index()
返回只出现一次的元素的下标
排序命令 :
usage
comments
reverse()
反转array的排序
sort()
用选定的方式升序排序(with)
rsort()
用选定的方式降序排序(with)
shuffle()
随机打乱排序,不能用with
可以通过class封装实现功能 :
1 2 3 4 5 6 7 8 9 10 11 12 13 14 15 16 17 18 19 20 21 22 23 24 25 26 27 28 29 30 31 class Register; string name; rand bit [3:0] rank; rand bit [3:0] pages; function void print(); $display("name=%s, rank=%0d, pages=%0d", name, rank, pages); endfunction endclass module tb; Register rt[4]; string name_arr[4] = '{"alexa", "siri", "google home", "cortana"}; initial begin foreach(rt[i]) begin rt[i] = new(name_arr[i]); rt[i].randomize(); rt[i].print(); end rt.sort(x) with(x.name); rt.sort(x) with({x.rank, x.pages}); end endmodule
数组归约方法 :
usage
comments
sum()
返回数组求和
product()
返回数组乘积
and()
返回所有元素按位与
or()
返回所有元素按位或
xor()
返回所有元素按位异或
queues queue 支持push/和pop操作,类似cpp的双端队列。
queue 有定长有边界和无边界。有边界的这样定义:
1 2 3 int bounded_queue [$:10];
无边界的是:
1 2 3 int unbounded_queue [$];
在之后的使用中,queue[$]用来代表最后一个元素,queue还可以进行片选,比如queue[1:$-1]就是去掉第一个和最后一个元素的片段。
一些可用的函数:
usage
comments
queue.size()
返回队列中的元素个数
queue.insert(input integer index, input elements_t item)
在指定位置插入指定元素
queue.delete([input integer index])
删除指定索引处的元素,如果不提供参数就会清空队列
queue.pop_front()
去除并返回队列首的元素
queue.pop_back()
去除并返回队列尾的元素
queue.push_front(input elements_t item)
在队列首压入元素
queue.push_back(input elements_t item)
在队列尾压入元素
queue of dynamic arrays 1 2 3 4 5 6 7 8 9 10 11 12 13 14 15 16 typedef string str_da []; modue tb; str_da list [$]; initial begin str_da marvel = '{"spiderman", "hulk"}; str_da dcworld = '{"batman", "superman"}; list.push_back(marvel); list.push_back(dcworld); end endmodule
struct struct 被引入了sv,可以把多个信号组合在一起,如下:
1 2 3 4 5 6 7 struct{ byte value1; int value2; string value3; }struct_name;
structure默认是unpacked的,不保证连续分配。如果要创建多个structure,建议使用typedef。
1 2 3 4 5 6 7 8 9 10 11 typedef struct{ string fruit; int count; byte expiry; }st_fruit; initial begin st_fruit fruit1 = '{"apple", 4,15}; st_fruit fruit2; end
如果要创建packed structure,
1 2 3 4 5 typedef struct packed{ ??????? }st_name;
这样可以保证分配出一段连续的空间。
array of structure 1 2 3 4 5 6 7 8 9 10 11 12 13 typedef struct { int data; string name; }MyStruct; module array_examples; MyStruct fixed_array[5]; MyStruct dynamic_array[]; MyStruct associative_array[int]; endmodule
typedef syntax typedef的使用方法是:
1 typedef data_type type_name [range];
alias 起别名。
1 2 3 4 logic [7:0] data; alias mydata = data; mydata = 8'hFF;
other datatype?
union:这是用于节省空间的,他的大小由内部最长的数据决定,内部所有数据共享空间,位宽小的信号量都是最长信号量的裁切。
1 2 3 4 5 6 7 typedef union packed{ logic [31:0] word; logic [15:0] halfword[2]; }u32_t;
packed代表bit-aligned,可以把整个union当成向量使用,halfword[0]为低16位,halfword[1]为高16位。
1 2 3 4 5 int dyn_array[]; dyn_array=new[10];
class, virtual class, mailbox, semaphore: OOP相关的性质也被引入systemverilog。
loop 可以使用的依旧是:forever,repeat,while,for,do-while,foreach.
branch 除了if else,systemverilog引入了几种新的分支控制来保证合规性检查通过。
unique if,当没有任何if分支匹配条件时,如果没有明确的指出else,就会报错;如果找到了多个匹配项,也会报错。
unique0 if,如果没有任何if分支匹配条件时,不会报错,其他和unique if相同。
1 2 3 4 5 6 unique if (x==3) ??? else if (x==5) ??? else
如果没有x=3,或者x=5,没有写最后的else就会报错。
还有一个是priority if,如果没有任何条件符合,或者是最后没有else就会报错。他执行完第一个符合的if分支就会退出。
systemverilog里面也有case语句,和verilog相同,但是也引入了一些新的东西。case同样可以用unique,unique0进行合法性检查,保证没有交叠执行。
同样的,如果多个匹配项,会报一个错,只执行第一个符合的分支;如果没有匹配项,使用unique的时候会报错。
1 2 3 4 unique case (x) 0:??? 2:??? endcase
function & task function和task几乎和verilog相同。
1 2 3 4 5 6 7 8 9 10 11 12 13 14 15 16 17 18 19 20 21 22 23 24 25 26 27 28 29 30 function [automatic] [return_type] name ([port_list]); [statements] endfunction //style 1 task [name]; input [port_list]; output [port_list]; begin [statements] end endtask //style 2 task [name] (input [port_list], output [port_list]); begin [statements] end endtask //style 3 task [name] (); begin [statements] end endtask
如果一个task是static的,他的成员会在同一个任务的并发调用之间共享;如果一个task是automatic的,他的成员是动态分配的,不会共享。除了在class中默认是automatic,其他多数场景(module, interface, program)默认是static。
比如:
1 2 3 4 5 6 7 8 9 10 11 12 13 14 15 module tb; initial display(); initial display(); initial display(); initial display(); // This is a static task task display(); integer i = 0; i = i + 1; $display("i=%0d", i); endtask endmodule
输出的结果是递增的。
1 2 3 4 5 6 7 8 9 10 11 12 13 14 15 16 module tb; initial display(); initial display(); initial display(); initial display(); // Note that the task is now automatic task automatic display(); integer i = 0; i = i + 1; $display("i=%0d", i); endtask endmodule
输出的结果永远是1。
此外任务还分全局和局部的,在模块之外定义的可以在任何模块调用,如果是在别的模块里定义的,需要:
1 2 3 4 5 6 7 8 9 10 11 12 13 14 15 16 17 module tb; des u0(); initial begin u0.display(); // Task is not visible in the module 'tb' end endmodule module des; initial begin display(); // Task definition is local to the module end task display(); $display("Hello World"); endtask endmodule
这样执行。
task还可以被disable停止,不过需要给任务起名,起名就在task的begin关键词之后。
parameter 参数几乎和verilog一致,本质上是一个常量,不在运行时修改,不重复声明已被使用的参数。
模块参数可以用defparam修改,新的参数端口定义方式是:
1 2 3 4 5 6 module design_ip #(parameter ??=??, parameter ???=???) ( input [??] ??, ... )
在模块实例化的时候,参数可以被覆盖,
1 2 3 4 5 6 7 8 9 10 module tb; // Module instantiation override design_ip #(BUS_WIDTH = 64, DATA_WIDTH = 128) d0 ( [port list]); // Use of defparam to override defparam d0.FIFO_DEPTH = 128; endmodule
还有一种参数叫specify parameter,主要用于提供时序和延迟参数:
1 2 3 4 5 6 7 8 9 10 11 12 13 14 15 // Use of specify block specify specparam t_rise = 200, t_fall = 150; specparam clk_to_q = 70, d_to_q = 100; endspecify // Within main module module my_block ( ... ); specparam dhold = 2.0; specparam ddly = 1.5; parameter WIDTH = 32; endmodule
specify parameter一般用于精确建模,module parameter一般适用于在实例化的时候提供灵活性。
delay control 一般使用两种控制方式:指定延迟具体时间,或者是延迟直到某个事件发生。当然如果存在会延迟的门电路和网络也会增加仿真时间。
在添加指定时间的延迟时,如果计算结果是未知或者高阻,就是延迟0延时;如果计算结果为负,会当成无符号数给延迟。
1 2 3 4 #(a-b) $display("T=%0t delay of %0dps", $realtime, a-b);
$realtime输出的是当前仿真时间。
事件控制一般用信号量值的变化表示,negedge表示从1到x,z,0或者是从x,z到0;posedge表示从0到x,z,1或者从x,z到1,使用方式是:
1 2 3 4 @(posedge a); @(negedge b);
也可以通过event声明一个可以显示触发的事件。
1 2 3 4 5 6 7 8 9 10 11 12 13 //declare event a_event; event b_events[5]; ... #20 -> a_event; #10 -> b_events[2]; ... always @(a_event)
当然还有隐式事件,比如敏感列表。(常见于always控制的组合电路)
也可以通过wait(),他会一直等待直到判读条件为真。
inter and intra assignment delay 1 2 3 4 5 #<delay> <LHS> = <RHS> //先延迟再赋值 <LHS> = #<delay> <RHS> //先求值,等延时结束在赋值
new concept threads & processes thread & process指可以独立运行的代码片段,initial,always,fork join都可以生成线程并行运行。
fork join fork join有三种:
where fork join used in the testbench? 如果需要并发运行多个任务,可以通过fork join生成线程。对于fork join,必须等待内部的所有线程执行完毕才能后继续向后执行。
1 2 3 4 5 6 7 8 9 10 11 12 13 14 15 16 initial begin fork // thread 1 #5 $display("1"); //thread 2 begin #1 $display("2"); #5 $display("3"); end join $display("4"); end
此处输出顺序是:2,1,3,4.
对应的,fork join_any在一个子线程结束后就会执行之后的代码,fork join_none会直接执行之后的代码。
nested fork join fork join可以实现嵌套使用。
why we need automatic task? 我们之前说了,如果不明确指定task是static还是automatic,默认为static,会在并发调用时共享,这会导致一个结果:
1 2 3 4 5 6 7 8 9 10 11 12 13 14 15 16 17 18 module tb; initial begin $display ("[%0t] Main Thread: Fork join going to start", $time); fork print (20, "Thread1_0"); print (30, "Thread1_1"); print (10, "Thread2"); join_none $display ("[%0t] Main Thread: Fork join has finished", $time); end // Note that this is not an automatic task, its static task print (int _time, string t_name); #(_time) $display ("[%0t] %s", $time, t_name); endtask endmodule
以上代码的输出结果是:
1 2 3 4 5 6 7 8 ncsim> run [0] Main Thread: Fork join going to start [0] Main Thread: Fork join has finished [10] Thread2 [20] Thread2 [30] Thread2 ncsim: *W,RNQUIE: Simulation is complete.
原因是三个print是共享资源,理论上同时开始的,假如print (10, "Thread2");执行最慢,他会把_time修改为10,把t_name修改为Thread2,导致最后输出结果都是Thread2,延迟时间变为10.
这时,如果设定task为automatic,输出的结果就不同了。
disable fork join 从fork join启动的线程可以通过disable fork实现终止。可以通过打上标签实现对于指定fork join块的控制:
1 2 3 4 5 6 7 8 tag:fork [???] join disable tag;
如果不带标签,会尝试终止当前进程中所有或用的fork join.
wait fork wait fork实现的功能是让主进程等待所有的派生进程执行完毕在继续执行。
communication 可以用来通信的机制有:
events
不同的线程可以通过事件进行同步
semaphores
同的线程访问统一资源时通过信号量轮流访问
mailbox
线程和组件之间交换数据时数据放入邮箱发送
events 事件的使用方法如下:
1 2 3 4 5 6 7 8 9 10 11 //create event event eventA; //trigger event -> eventA; //wait for event to happen @eventA; wait(eventA.triggered);
把事件作为参数:
1 2 3 4 5 6 7 8 9 10 11 12 13 task waitForTrigger(event eventA); wait(eventA.triggered); [???] endtask initial begin waitForTrigger(eventB); #5 -> eventB; end
事件可以分配和比较,可以被赋值为null。
.triggered.triggered的触发是持续性的,他会一直被触发直到仿真结束。有助于避免wait和@同时出现导致的竞争错误。
wait_order 如果有多个事件同时被触发,可能会出现错误,使用wait_order可以指定触发(响应)顺序,如果事件并不是按照指定的顺序触发则会报错。
1 2 3 4 5 6 7 8 9 10 11 12 13 14 15 16 17 18 19 20 21 22 module tb; // Declare three events that can be triggered separately event a, b, c; // This block triggers each event one by one initial begin #10 -> a; #10 -> b; #10 -> c; end // This block waits until each event is triggered in the given order initial begin wait_order (a,b,c) $display ("Events were executed in the correct order"); else $display ("Events were NOT executed in the correct order !"); end endmodule
semaphore 类似于互斥锁的概念。通过同时只有一个实体用有这个信号量实现互斥访问。
1 2 3 4 5 6 7 8 9 10 11 12 13 14 15 16 17 18 19 20 21 22 23 24 25 26 27 28 29 30 31 32 33 34 35 36 37 38 39 40 41 42 43 44 module tb_top; // Create a semaphore handle called "key" semaphore key; initial begin // Create only a single key; multiple keys are also possible key = new (1); fork // personA tries to get the room and puts it back after work personA (); // personB also tries to get the room and puts it back after work personB (); // personA tries to get the room a second time #25 personA (); join_none end task getRoom (bit [1:0] id); $display ("[%0t] Trying to get a room for id[%0d] ...", $time, id); key.get (1); $display ("[%0t] Room Key retrieved for id[%0d]", $time, id); endtask task putRoom (bit [1:0] id); $display ("[%0t] Leaving room id[%0d] ...", $time, id); key.put (1); $display ("[%0t] Room Key put back id[%0d]", $time, id); endtask // This person tries to get the room immediately and puts // it back 20 time units later task personA (); getRoom (1); #20 putRoom (1); endtask // This person tries to get the room after 5 time units and puts it back after // 10 time units task personB (); #5 getRoom (2); #10 putRoom (2); endtask endmodule
semaphore通过new()完成创建,内部参数指定资源的数量,通过get()来尝试获取资源,如没有资源则会等待直到资源可用;put()用来释放资源。
具体描述如下:
usage
comments
semaphoreA = new(int keycount = 0)
指定分配的资源数量
semaphoreA.get(int keycount = 1)
指定要获取的资源数量
semaphoreA.put(int keycount = 1)
指定要释放的资源数量
mailbox mailbox的通信类似于在双方之间建立专用通道,一方放入信息后另一方可以从maibox取走。
1 2 3 4 5 6 7 8 9 10 11 12 13 14 15 16 17 18 19 20 21 22 23 24 25 26 27 28 29 30 31 32 33 34 35 36 37 38 39 40 41 42 43 44 45 46 47 48 49 50 51 52 53 54 55 56 57 58 59 60 61 62 // Data packet in this environment class transaction; rand bit [7:0] data; function display (); $display ("[%0t] Data = 0x%0h", $time, data); endfunction endclass // Generator class - Generate a transaction object and put into mailbox class generator; mailbox mbx; function new (mailbox mbx); this.mbx = mbx; endfunction task genData (); transaction trns = new (); trns.randomize (); trns.display (); $display ("[%0t] [Generator] Going to put data packet into mailbox", $time); mbx.put (trns); $display ("[%0t] [Generator] Data put into mailbox", $time); endtask endclass // Driver class - Get the transaction object from Generator class driver; mailbox mbx; function new (mailbox mbx); this.mbx = mbx; endfunction task drvData (); transaction drvTrns = new (); $display ("[%0t] [Driver] Waiting for available data", $time); mbx.get (drvTrns); $display ("[%0t] [Driver] Data received from Mailbox", $time); drvTrns.display (); endtask endclass // Top Level environment that will connect Gen and Drv with a mailbox module tb_top; mailbox mbx; generator Gen; driver Drv; initial begin mbx = new (); Gen = new (mbx); Drv = new (mbx); fork #10 Gen.genData (); Drv.drvData (); join_none end endmodule
maibox,同样通过new()创建,使用get(),put()完成通信。
具体用法如下:
usage
comments
mailboxA = new(int bound = 0);
创建邮箱并指定大小
mailboxA.num()
返回当前邮件数量
mailboxA.put(singular message)
阻塞,按照FIFO把消息存入邮箱
mailboxA.try_put(singular message)
邮箱未满存储邮件,成功返回正整数,失败返回0,非阻塞
mailboxA.get(ref singular message)
阻塞,一直检索直到取出信息
mailboxA.try_get(ref singular message)
非阻塞,尝试取出消息,邮箱为空返回0
mailboxA.peek(ref singular message)
从邮箱中复制消息,不删除邮箱里面的消息
mailboxA.try_peek(ref singular message)
尝试从邮箱复制消息,不删除邮箱里面的消息
邮箱有有限队列大小和无限队列大小的,如果有限的空间被放满就会暂停放入信息。
实际上邮箱不能按索引控制,只能够FIFO
邮箱有两种类型,generic可以接收任何类型的数据,parameterized只能接受指定类型的数据。默认的邮箱是通用的。
如果我们要创建一个指定收发string的邮箱:
1 2 3 4 5 typedef mailbox #(string) s_mbox; s_mbox string_mailbox;
1 2 3 4 5 6 7 8 9 10 11 12 13 14 15 16 17 18 19 20 21 22 23 24 25 26 27 28 29 30 31 32 33 34 35 36 37 38 39 40 41 42 43 44 45 46 47 48 49 50 51 52 53 54 55 56 57 58 59 // Create alias for parameterized "string" type mailbox typedef mailbox #(string) s_mbox; // Define a component to send messages class comp1; // Create a mailbox handle to put items s_mbox names; // Define a task to put items into the mailbox task send (); for (int i = 0; i < 3; i++) begin string s = $sformatf ("name_%0d", i); #1 $display ("[%0t] Comp1: Put %s", $time, s); names.put(s); end endtask endclass // Define a second component to receive messages class comp2; // Create a mailbox handle to receive items s_mbox list; // Create a loop that continuously gets an item from // the mailbox task receive (); forever begin string s; list.get(s); $display ("[%0t] Comp2: Got %s", $time, s); end endtask endclass // Connect both mailbox handles at a higher level module tb; // Declare a global mailbox and create both components s_mbox m_mbx = new(); comp1 m_comp1 = new(); comp2 m_comp2 = new(); initial begin // Assign both mailbox handles in components with the // global mailbox m_comp1.names = m_mbx; m_comp2.list = m_mbx; // Start both components, where comp1 keeps sending // and comp2 keeps receiving fork m_comp1.send(); m_comp2.receive(); join end endmodule
mailbox race 1 2 3 4 5 6 7 8 9 10 11 12 13 14 15 16 17 18 19 20 21 22 23 24 module tb; // Create a new mailbox that can hold utmost 2 items mailbox mbx = new(2); // Block1: This block keeps putting items into the mailbox // The rate of items being put into the mailbox is 1 every ns initial begin for (int i=0; i < 5; i++) begin #1 mbx.put (i); $display ("[%0t] Thread0: Put item #%0d, size=%0d", $time, i, mbx.num()); end end // Block2: This block keeps getting items from the mailbox // The rate of items received from the mailbox is 2 every ns initial begin forever begin int idx; #2 mbx.get (idx); $display ("[%0t] Thread1: Got item #%0d, size=%0d", $time, idx, mbx.num()); end end endmodule
这样的写法会有竞态,在同一个delta周期内,两个线程可以同时对mailbox操作。
delta周期指一种逻辑无限小的时间步长,比如我们认为两个理论上同时发生的事情实际上有先后顺序,就是一种delta周期。
interface interface就是把接口信息封装为一个整体模块方便使用和复用。这里有一个APB总线协议信号的interface定义:
1 2 3 4 5 6 7 8 9 10 11 12 13 14 15 16 17 18 // define: interface [interface_name] ([port_list]); [list_of_signals] endinterface interface apb_if(input pclk); logic [31:0] paddr; logic [31:0] pwdata; logic [31:0] prdata; logic penable; logic pwrite; logic psel; endinterface
why are signals declared as logic? logic灵活性强,在verilog里面只能在过程块中驱动reg,只能用assign驱动wire,但是logic可以接受两种驱动方式。
同时连接到DUT的信号应该需要支持四态,logic是支持四态的,如果使用bit,x/z会显示为0.
how to define port directions? 使用modport完成信号方向的定义。不同的modport会传递给不同的组件。
1 2 3 4 5 6 7 8 9 10 11 12 13 14 15 16 17 18 //define modport [identifier] (input [port_list], output [port_list]); interface myBus (input clk); logic [7:0] data; logic enable; modport TB (input data, clk, output enable); modport DUT (output data, input enable, clk); endinterface
关于实际使用:
如果module定义的时指定了传输方向:module x (myBus.DUT _if);,那么只需要实例化时传入_if,就会自动决定信号方向为DUT;如果在定义的时候没有指明,那就需要在实例化的时候传入modport信息:x dutx (_if.DUT);
how to connect an interface with DUT? 当在顶层测试文件里实例化DUT的时候就应该创建一个interface对象并传递给DUT。
1 2 3 4 5 6 7 8 9 10 11 12 13 14 15 16 17 18 19 20 21 22 23 24 25 26 27 28 29 30 31 module dut (myBus busIf); always @ (posedge busIf.clk) if (busIf.enable) busIf.data <= busIf.data + 1; else busIf.data <= 0; endmodule // filename: tb_top.sv module tb_top; bit clk; always #10 clk = ~clk; //create interface myBus busIf (clk); dut dut0 (busIf.DUT);// pass modport -> DUT; initial begin busIf.enable <= 0; #10 busIf.enable <= 1; #40 busIf.enable <= 0; #20 busIf.enable <= 1; #100 $finish; end endmodule
advantages 除了方便调用,接口还可以包含任务,函数,参数,变量,功能覆盖和断言,由此可以监控代码块内部通过接口传递的信息。他甚至还可以包含initial,always,assign.
parameterized 设置参数的方法是:
1 2 3 4 5 6 7 interface myBus #(parameter D_WIDTH=32)(input clk); logic [D_WIDTH-1:0] data; logic enable; endinterface
clocking blocks 一个interface里面可以设置多个clocking blocks,在clockingblock里定义的信号会按照这个clock信号进行驱动或采样。主要用于测试相关的信号。可以在这里定义tb以怎样的时钟驱动DUT或者是从DUT中采集结果。
clocking block可以解决一部分竞争问题,但是无法完全解决。
当然这里也是可以参数化的(指时钟偏移)。
1 2 3 4 5 6 7 8 9 interface my_interface (input bit clk); clocking cb_clk @(posedge clk); default input #3ns output #2ns; input enable; output data; endclocking endinterface
这里指定的是默认情况,输入应该在时钟上升前3ns采样,输出在时钟上升沿后2ns驱动。
how to use a clocking block? 1 2 3 4 5 6 7 //wait for posedge ? @my_interface.cb_clk; // clocking block my_interface.enable = 1;
如果使用的是clockingblock,直接赋值就可以让信号在下一个时钟上升沿后2ns被驱动。
example of interface
1 2 3 4 5 6 7 8 9 10 11 12 13 14 15 16 17 18 19 20 21 22 23 24 25 26 27 28 29 30 31 32 33 34 35 36 37 38 39 40 41 42 43 44 45 46 47 48 49 50 51 52 53 54 55 56 57 58 59 60 61 62 63 64 65 66 67 68 69 70 71 72 73 74 75 76 77 // filename: interface.sv interface cnt_if #(parameter WIDTH = 4) (input bit clk); logic rstn; logic load_en; logic [WIDTH-1:0] load; logic [WIDTH-1:0] count; logic down; logic rollover; endinterface //filename:counter.sv module counter_ud #(parameter WIDTH = 4)(cnt_if _if) always @(posedge _if.clk or negedge _if.rstn) begin if(!_if.rstn) _if.count <= 0; else begin if(_if.load_en) _if.count <= _if.count - 1; else _if.count <= _if.count + 1; end end assign _if.rollover = &_if.count; endmodule //filename:tb_top.sv module tb; reg clk; always #10 clk=~clk; cnt_if cnt_if0(clk); counter_ud c0 (cnt_if0); initial begin bit load_en, down; bit [3:0] load; $monitor("[%0t] down=%0b load_en=%0b load=0x%0h count=0x%0h rollover=%0b", $time, cnt_if0.down, cnt_if0.load_en, cnt_if0.load, cnt_if0.count, cnt_if0.rollover); // Initialize testbench variables clk <= 0; cnt_if0.rstn <= 0; cnt_if0.load_en <= 0; cnt_if0.load <= 0; cnt_if0.down <= 0; // Drive design out of reset after 5 clocks repeat (5) @(posedge clk); cnt_if0.rstn <= 1; // Drive stimulus -> repeat 5 times for (int i = 0; i < 5; i++) begin // Drive inputs after some random delay int delay = $urandom_range (1,30); #(delay); // Randomize input values to be driven std::randomize(load, load_en, down); // Assign tb values to interface signals cnt_if0.load <= load; cnt_if0.load_en <= load_en; cnt_if0.down <= down; end // Wait for 5 clocks and finish simulation repeat(5) @ (posedge clk); $finish; end endmodule
interface array 创建一个接口队列:
1 2 3 4 5 6 7 8 9 10 11 12 13 14 15 16 17 interface myInterface (); reg gnt; reg ack; reg [7:0] irq; endinterface module tb; myInterface if0(); myInterface wb_if[3:0](); mydesgin top (if0); mydesgin md0 (wb_if[0]); mydesgin md1 (wb_if[1]); mydesgin md2 (wb_if[2]); mydesgin md3 (wb_if[3]); endmodule
关于ref和inout以及隐式指定 当一个sv interface对象用做模块的端口,接口内部的信号会被默认赋予特殊的连接类型,简单来说,如果在interface内部定义为variables,比如logic, reg, bit等,会默认为ref(引用是读写共享的),如果定义为nets,比如wire,tri,就会被默认为inout.这样做是为了当没有modport指明传递方向的时候可以保证信号仍然可以被传递。
当接口实例名称和模块端口名称相同,可以使用隐式端口连接。假如有一个接口:
有一个使用他的模块:
1 2 3 module counter_ud(cnt_if _if);
如果实例化的接口也叫_if:
就可以实现隐式连接:
1 2 3 4 counter_ud u_cnt(.*); //counter_ud u_cnt(. _if);
另:这也是modport必要性的体现,如果所有端口都是inout,最后网络上可能会出现很多x值。
bundle 使用具体的名称显然是不如通用方式更加灵活的。如果需要修改接口,使用generic bundle的方式就可以减少很多麻烦。
假如我们把传入的接口写死,就必须接受完全一致的传入interface:
1 2 3 4 5 6 7 8 9 10 11 12 13 14 15 //define module mydesign (myinterface if0, input logic clk); ... endmodule module yourdesign (myinterface if0, input logic clk); ... endmodule module tb; myinterface _if; mydesgin md0 (_if, clk); yourdesign yd0 (_if, clk); endmodule
如果是仅指明传入interface,只需要信号匹配就可以接受:
1 2 3 4 5 6 7 8 9 10 11 12 13 14 15 16 17 18 19 20 module mydesign (interface a, input logic clk); ... endmodule module yourdesign (interface b, input logic clk); ... endmodule module tb; myinterface _if; yourinterface _yif; mydesgin md0 (.a(_if), .clk(clk)); yourdesign yd0 (.b(_yif), .clk(clk)); endmodule
另外,关于隐式传递,如果module名称和modport名称相同会自动选择对应的信号传递方向。虽然这样写着省事一点,但是我个人看来还是指明写比较好,不会花费多长时间,但是可以看的清楚一点。
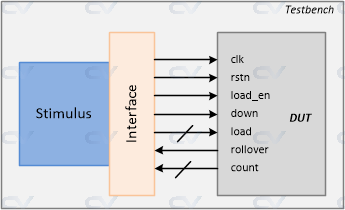
what is a testbench? 在实际上的systemverilog测试,为了使自己写的代码能够具有模块化,可扩展,灵活性等特点,就不能够再像以前一样把所有的东西都放到一个tb文件里面了。
一般的文件组织如下:
generator: 用来生成被测模块需要的信号。
interface: interface用来描述可以被实际驱动和检测的信号。
driver: 将生成的信号连接到需要测试的模块上。
monitor: 用来捕获需要检测的信号量用以检测功能的正确。
scoreboard: 比对检测设计的输出是否符合预期。
environment: 用来为以上所有的测试过程提供需要的环境。
test: 这个文件包含可以通过微调实现不同设定的环境。
我们一般把实际流片制造出来芯片之后需要被测试的device称为Design Under Test,把在此之前的验证过程中,将其称为Design Under Verification.
what is an interface? 如果一个模块有很多端口的话,重用,连接等都是十分麻烦的,所以在测试中会把这些端口封装为一个interface方便使用。(其实还是类似class)
what is a driver? driver用于给DUT/DUV提供实际的信号输入激励。值得一提的是,driver给DUT/DUV提供激励的方式是调用封装在interface的一个task,这就很方便了,我们无需知道实际的信号时序(在写driver的时候),同时当interface内部的信号修改以后driver可以不用修改就可以为新的interface提供信号输入。
what is a generator? && how driver know what to drive? generator可以生成测试信号并把这些信号发送给driver,driver直接通过interface就可以完成信号驱动。
why is a monior required? monitor可以从被测模块收集需要的信号,然后把他整合发送给scoreboard.
why scoreboard? scoreboard可以构建一个reference model,实现一个模拟的DUT的功能,可以用来生成DUT在不同信号驱动下的预期行为及其信号输出。传送给DUT的信号也被传给reference model,之后 就进行预期结果和实际结果的比对,检测DUT是否有设计缺陷。
why we need an environment? 这个文件主要是为了项目的灵活性和可扩展性,如果有更多的功能需要加入项目,通过这个文件可以添加dependency.
what can test do? 当然是用来实例化然后测试的。
但是实际上在测试时并不是只测试一次就够了,而是要进行很多次,每次测试都修改一次配置是不现实的,所以实际上会有一些插件来实现每次测试都对一些参数进行微调,完成多次测试。
比如说,我们经常这么写:
1 2 3 4 #5 reset<= 0 ; #15 reset <= 1 ;
我们可以把这两个信号放到一个apply_reset任务里面,直接使用apply_reset就可以了,就可以无视其中的具体细节。
1 2 3 4 5 6 7 8 9 10 11 12 13 14 module tb_top; bit resetn; task apply_reset(); #5 resetn <= 0 ; #10 resetn <= 1 ; endtask initial begin apply_reset(); end endmodule
从零开始的DFT工程师! homepage project homepage is here .